
Audi 90 Fuel Pump Replacement


Thread Starter
Audi Forum - Posts like an A1
Joined: Mar 2013
Posts: 25
From: usa

Q. Hi, can you send me illustration about how to remove and replace a fuel pump of a 1993 Audi 90 or at least can you tell me where the fuel pump is located, because I follow the fuel lines from the injectors to the tank cannot find it... I will be highly appreciated.
Thank you...
A The fuel pump is inside the fuel tank. But the good news is you do not need to drop the fuel tank to replace it. here's how you do it.
REMOVAL
1.Insure you have the radio security code if the vehicle is so equipped.
2.Disconnect battery ground cable.
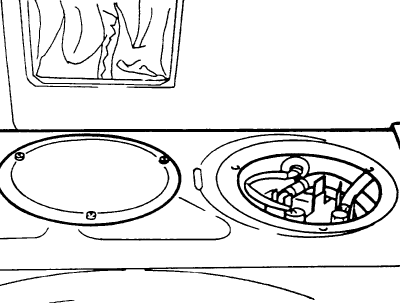
3.Remove screws and fuel gauge sender cover located under luggage compartment trim, then disconnect fuel gauge and pump electrical connector from outer side of flange assembly.
4.Wrap fuel lines in a suitable shop towel, then slowly open fuel lines to bleed off residual pressure, then disconnect fuel lines.
5.Using Collar nut tool No. 3217, or equivalent, unscrew nut from flange assembly and fuel tank. Note position of alignment marks on tank and flange for later assemble.
6.Disconnect fuel lines and electrical connector from inner side of flange assembly.

7.Remove fuel level sender by pressing release catch on side of sender unit, then lifting sender from tank.

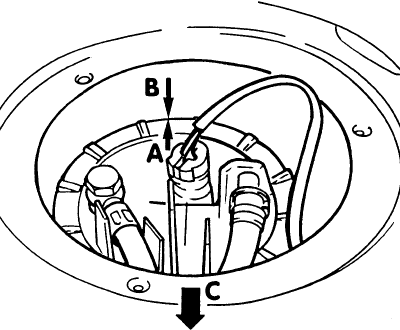
8.Insert fuel pump wrench tool No. 3307, or equivalent, through tank opening and place on inner part of surge housing.
9.Rotate inner part of surge housing approximately 150and lift out fuel pump.
INSTALLATION
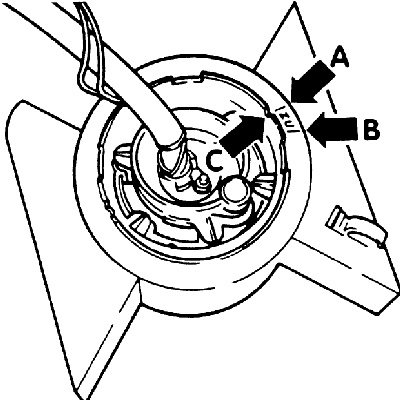
1.Install fuel pump with upper section of surge housing so that notch C aligns with mark A on upper part of housing Fig. 26.
2.Apply fuel pump wrench tool No. 3307, or equivalent, and rotate upper section of housing to right stop. Align marks C and B.
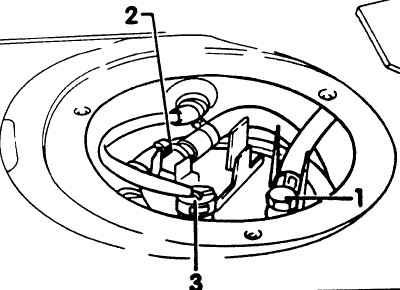
3.Push fuel return line (1), Fig. 27, onto flange assembly until clamp latches to flange pin.
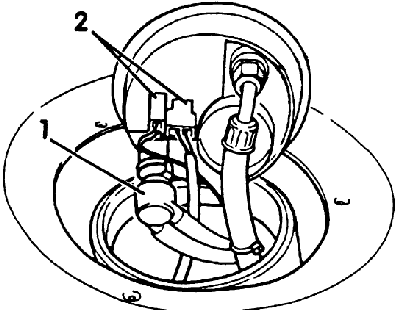
4.On FWD models, connect fuel sending unit harness connector (2), to inner side of flange assembly so that wiring lies over fuel SUPPLY line and does not interfere with level sensor operation, Fig. 27.
5.On AWD models, connect fuel sending unit harness connector (2) to flange assembly so that wiring lies over fuel RETURN line and does not interfere with level sensor operation.
6.Install flange assembly to tank, note alignment marks, then install collar nut and tighten using collar nut wrench tool No. 3217, or equivalent.
7.Install fuel lines and electrical connector to outer side of flange assembly.
8.Install fuel gauge sender cover located under luggage compartment trim.
9.Connect battery ground cable.
Thank you...
A The fuel pump is inside the fuel tank. But the good news is you do not need to drop the fuel tank to replace it. here's how you do it.
REMOVAL
1.Insure you have the radio security code if the vehicle is so equipped.
2.Disconnect battery ground cable.
3.Remove screws and fuel gauge sender cover located under luggage compartment trim, then disconnect fuel gauge and pump electrical connector from outer side of flange assembly.
4.Wrap fuel lines in a suitable shop towel, then slowly open fuel lines to bleed off residual pressure, then disconnect fuel lines.
5.Using Collar nut tool No. 3217, or equivalent, unscrew nut from flange assembly and fuel tank. Note position of alignment marks on tank and flange for later assemble.
6.Disconnect fuel lines and electrical connector from inner side of flange assembly.
7.Remove fuel level sender by pressing release catch on side of sender unit, then lifting sender from tank.
8.Insert fuel pump wrench tool No. 3307, or equivalent, through tank opening and place on inner part of surge housing.
9.Rotate inner part of surge housing approximately 150and lift out fuel pump.
INSTALLATION
1.Install fuel pump with upper section of surge housing so that notch C aligns with mark A on upper part of housing Fig. 26.
2.Apply fuel pump wrench tool No. 3307, or equivalent, and rotate upper section of housing to right stop. Align marks C and B.
3.Push fuel return line (1), Fig. 27, onto flange assembly until clamp latches to flange pin.
4.On FWD models, connect fuel sending unit harness connector (2), to inner side of flange assembly so that wiring lies over fuel SUPPLY line and does not interfere with level sensor operation, Fig. 27.
5.On AWD models, connect fuel sending unit harness connector (2) to flange assembly so that wiring lies over fuel RETURN line and does not interfere with level sensor operation.
6.Install flange assembly to tank, note alignment marks, then install collar nut and tighten using collar nut wrench tool No. 3217, or equivalent.
7.Install fuel lines and electrical connector to outer side of flange assembly.
8.Install fuel gauge sender cover located under luggage compartment trim.
9.Connect battery ground cable.

Thread
Thread Starter
Forum
Replies
Last Post
T-Wall
Audi parts for sale & wanted.
0
Jun 10, 2015 11:36 AM
Currently Active Users Viewing This Thread: 1 (0 members and 1 guests)


