
A4 B5 Front brake (Pads & Rotors) Replacement DIY with Pics!


Thread Starter
Audi Forum - Posts like an A5
Joined: Oct 2010
Posts: 382
From: Republic of B.C.!

Disclaimer: If you mess something up, not my fault. If you dont feel comfortable working on your car, then dont. Mechanics need to feed their children too.
Replacing the front pads and rotors is pretty easy, and if you can turn a wrench you shouldnt have any problems.
Tools needed:
A large C-Clamp
Edit: After doing this again, looks like I messed up here..the guide pins are either T40 or T45 (OE were T45, replacements were T40 on mine), and not a 7mm hex
19mm socket
Pliers and a flat head screwdriver
Whatever you use to get your car off the ground and take the wheels off.(jack/stands/etc)
Nice to have but not needed:
Syringe/something to catch the break fluid as it overflows.
Liquid wrench
Breaker bar/pipe.
Bentley repair manual
Materials:
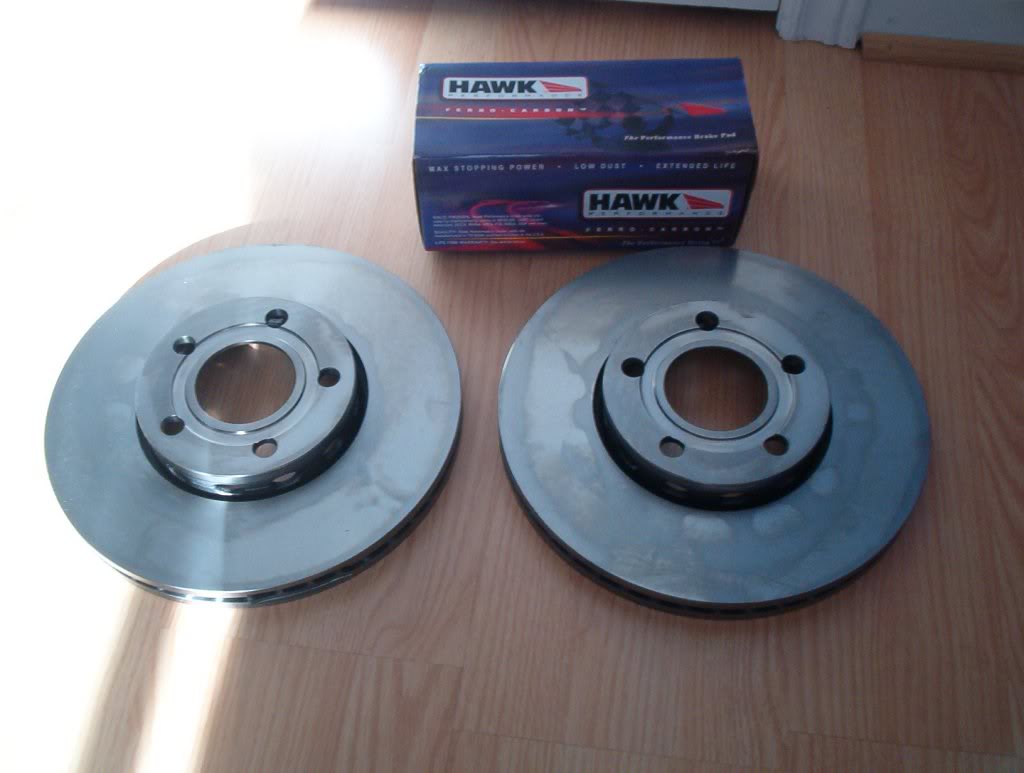
New Pads
New Rotors
New Guide Pins (optional) Part num: 321 615 141
1. Jack up your car, and remove the front wheels. Make sure its secured on jack stands. You can do both at once, or one side at a time. Eitherway, do not use the OEM jack, as you may need to put your head below the rotor at certain times.
2. If your car has brake wear sensors disconnect them first. Follow the wire from the brake pad to the harness (circled in red below). You will need to pry the little tab and turn it 90 degrees. Then lift the harness out of the bracket and disconnect it.
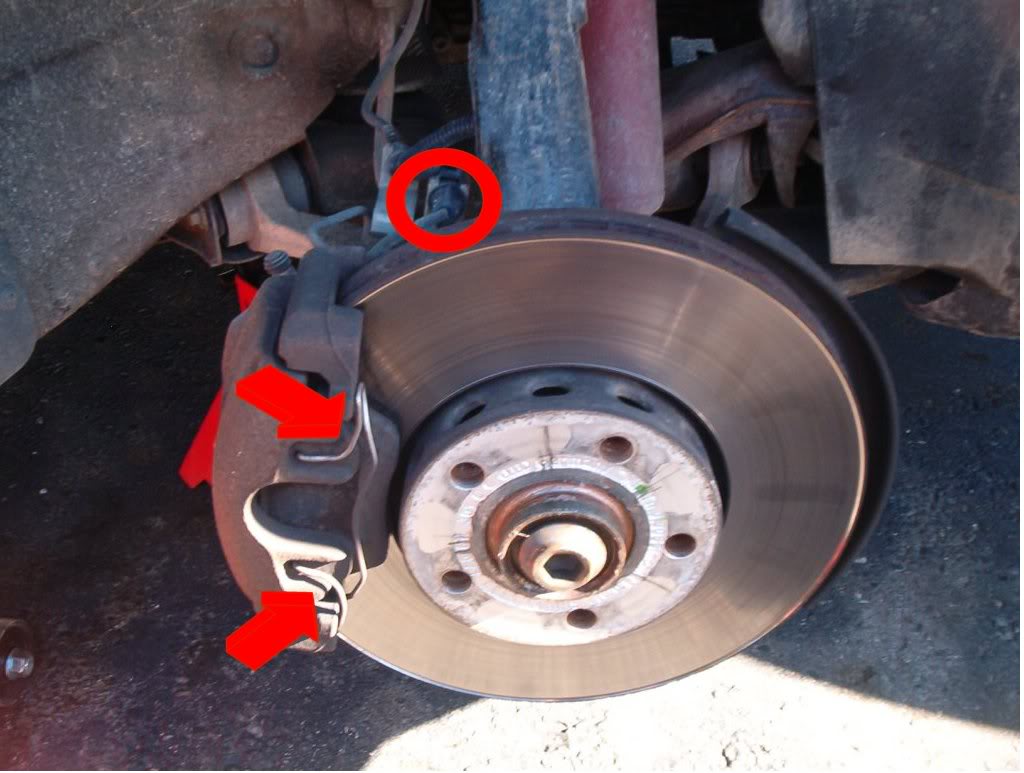
3. Using a flathead and/or pliers remove the spring. (red arrows above)
4. On the rear of the caliper there are two rubber caps, one near the top the other near the bottom. Take those off, and inside you will find a T40/T45 screw. Remove both of screws, and check their condition as they may need to be replaced. Sorry, no pics of that.
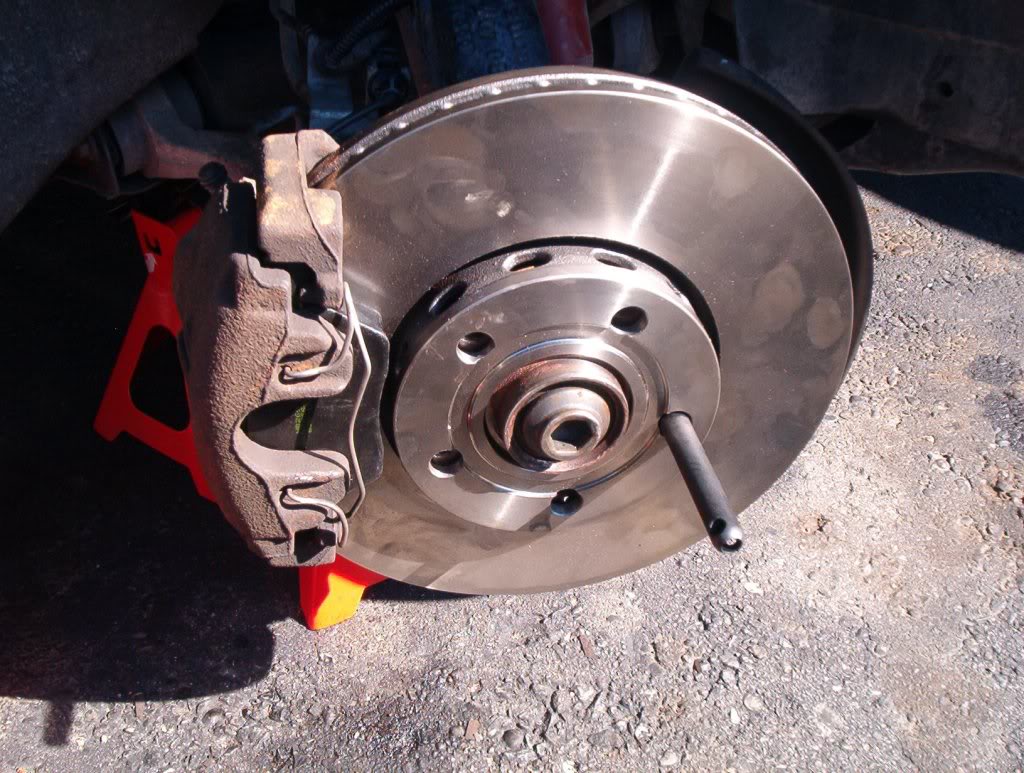
At this point you should be able to take the caliper off, be careful not to rip anything. Once you get it off, secure it so that it does not fall to the ground. You can either support it on a jack stand, or tape it to the lower control arm, or anything else you see fit. If youre not replacing the rotors, skip down to step 7.
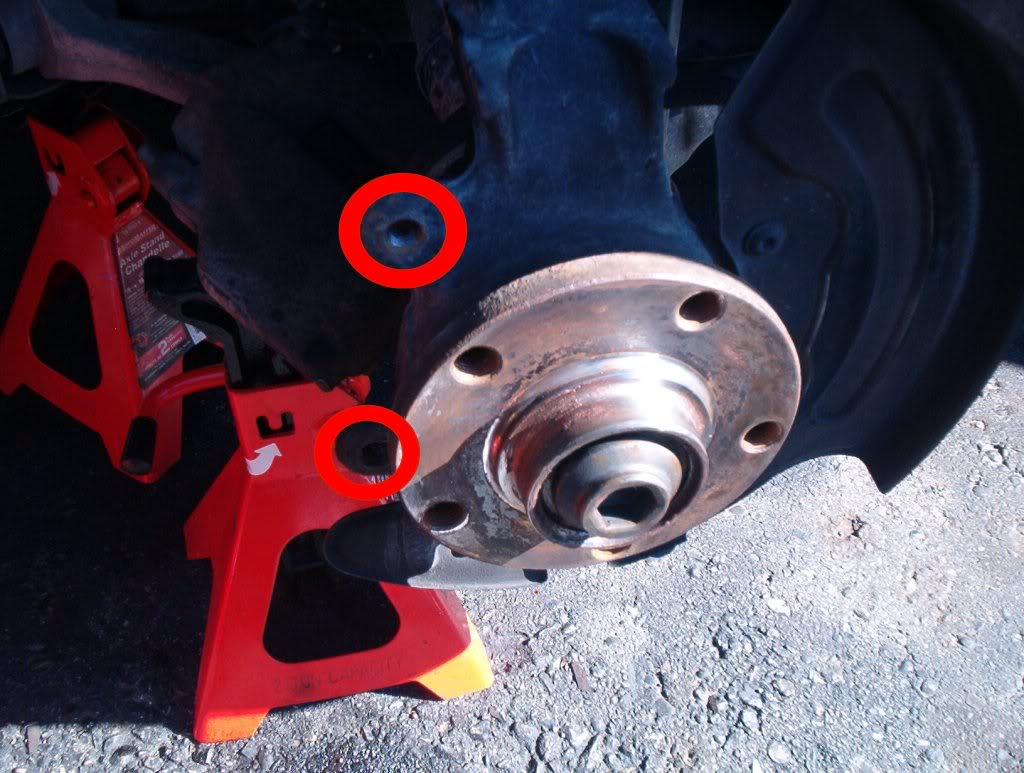
5. Removing the caliper carrier: the carrier is attached using two 19mm bolts located in the back (circled in red below). These were a real pain in the *** to break. But after half a can of liquid wrench, a broken 19mm and extension they came off. When you remove these, the rotor should come off with out any effort, if it doesnt give it a few taps to loosen it.
6. Install new rotors, and put the carrier back on. Tighten bolts to 92 ft
lb.
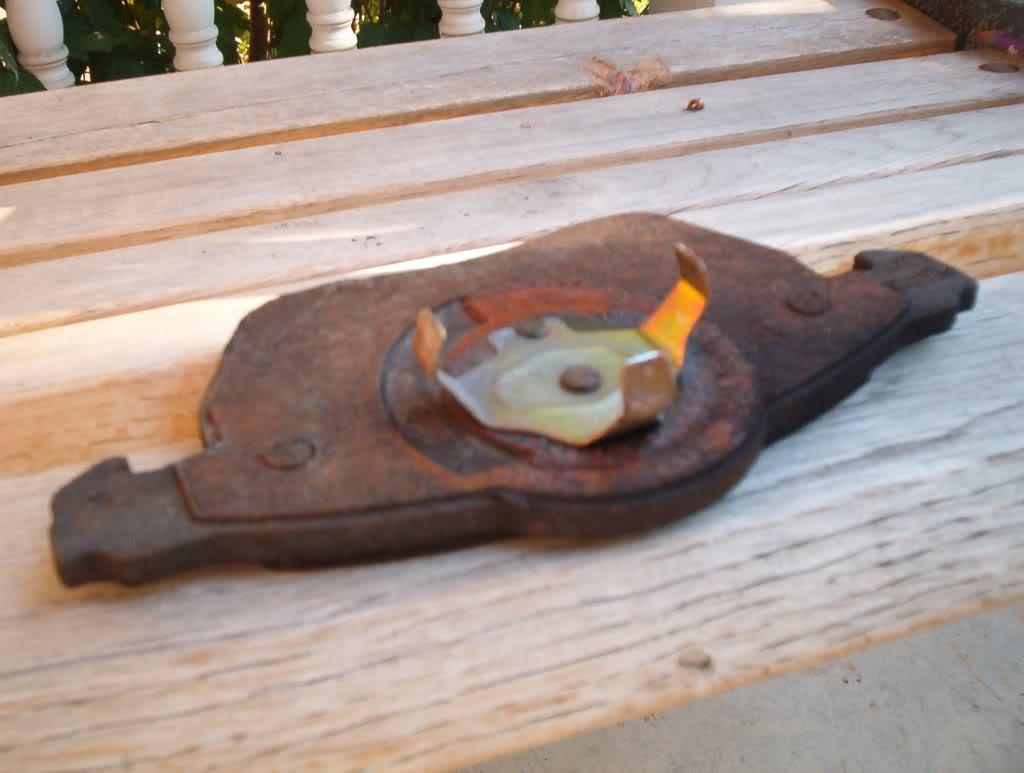
7. Replacing the pads: Pull out the old pads, the front one should just fall out, the rear is secured in place by a springed claw (see pic below), just pull it out.
8. Now open your brake fulid reservoir cap as you will need to keep an eye on the fluid level. Using a C-Clamp, slowly push in the piston on the caliper until you feel resistance. If the brake fluid begins to over flow, remove some of it using the syringe. I didnt have any thing to catch the fluid with, so I just put some old rags around it to absorb it.
9. Install the new pads in the same position as the old ones were located, place the caliper over the rotor and re-grease and install the screws you removed in step 4. Tighten these to 18 ft lb. If you cant fit the new pads over the rotor, then you havent pushed the piston in all the way.
10. Reinstall the rubber caps, put in the springs, and reconnect the brake wear sensors. Once you finish one side, pump the pedal a bit as that will drop the brake fluid level. Then do the other side. Once both sides are done, pump the brake pedal a few times again.
11. Final step is to properly bed in your new brakes. Follow the instructions that came with your pads, or check the manufacturers website. The instructions for my pads (HAWK HPS) were as follows:
a. After installing new brake pads, make 6 to 10 stops from approximately 30-35 mph applying moderate pressure.
b. Make an additional 2 to 3 hard stops from approximately 40 to 45 mph.
DO NOT DRAG BRAKES!
c. Allow 15 minutes for brake system to cool down.
After step 4 your new pads are ready for use.
Finished product:
SOURCE
Replacing the front pads and rotors is pretty easy, and if you can turn a wrench you shouldnt have any problems.
Tools needed:
A large C-Clamp
Edit: After doing this again, looks like I messed up here..the guide pins are either T40 or T45 (OE were T45, replacements were T40 on mine), and not a 7mm hex
19mm socket
Pliers and a flat head screwdriver
Whatever you use to get your car off the ground and take the wheels off.(jack/stands/etc)
Nice to have but not needed:
Syringe/something to catch the break fluid as it overflows.
Liquid wrench
Breaker bar/pipe.
Bentley repair manual
Materials:
New Pads
New Rotors
New Guide Pins (optional) Part num: 321 615 141
1. Jack up your car, and remove the front wheels. Make sure its secured on jack stands. You can do both at once, or one side at a time. Eitherway, do not use the OEM jack, as you may need to put your head below the rotor at certain times.
2. If your car has brake wear sensors disconnect them first. Follow the wire from the brake pad to the harness (circled in red below). You will need to pry the little tab and turn it 90 degrees. Then lift the harness out of the bracket and disconnect it.
3. Using a flathead and/or pliers remove the spring. (red arrows above)
4. On the rear of the caliper there are two rubber caps, one near the top the other near the bottom. Take those off, and inside you will find a T40/T45 screw. Remove both of screws, and check their condition as they may need to be replaced. Sorry, no pics of that.
At this point you should be able to take the caliper off, be careful not to rip anything. Once you get it off, secure it so that it does not fall to the ground. You can either support it on a jack stand, or tape it to the lower control arm, or anything else you see fit. If youre not replacing the rotors, skip down to step 7.
5. Removing the caliper carrier: the carrier is attached using two 19mm bolts located in the back (circled in red below). These were a real pain in the *** to break. But after half a can of liquid wrench, a broken 19mm and extension they came off. When you remove these, the rotor should come off with out any effort, if it doesnt give it a few taps to loosen it.
6. Install new rotors, and put the carrier back on. Tighten bolts to 92 ft
lb.
7. Replacing the pads: Pull out the old pads, the front one should just fall out, the rear is secured in place by a springed claw (see pic below), just pull it out.
8. Now open your brake fulid reservoir cap as you will need to keep an eye on the fluid level. Using a C-Clamp, slowly push in the piston on the caliper until you feel resistance. If the brake fluid begins to over flow, remove some of it using the syringe. I didnt have any thing to catch the fluid with, so I just put some old rags around it to absorb it.
9. Install the new pads in the same position as the old ones were located, place the caliper over the rotor and re-grease and install the screws you removed in step 4. Tighten these to 18 ft lb. If you cant fit the new pads over the rotor, then you havent pushed the piston in all the way.
10. Reinstall the rubber caps, put in the springs, and reconnect the brake wear sensors. Once you finish one side, pump the pedal a bit as that will drop the brake fluid level. Then do the other side. Once both sides are done, pump the brake pedal a few times again.
11. Final step is to properly bed in your new brakes. Follow the instructions that came with your pads, or check the manufacturers website. The instructions for my pads (HAWK HPS) were as follows:
a. After installing new brake pads, make 6 to 10 stops from approximately 30-35 mph applying moderate pressure.
b. Make an additional 2 to 3 hard stops from approximately 40 to 45 mph.
DO NOT DRAG BRAKES!
c. Allow 15 minutes for brake system to cool down.
After step 4 your new pads are ready for use.
Finished product:
SOURCE
Last edited by mksu19; Jan 2, 2011 at 08:11 PM.

Audi Forum - Posts like an A3
Joined: Nov 2010
Posts: 84
From: Calgary AB
Hello readership. Let me start by saying that I thoroughly enjoy and appreciate the energy and participation in this forum and particularily Mona's impecable input.
That said, steering and brakes are the two vehicle systems that are regulated by Transport Canada as requiring a mechanics licence. Do not do work on other people's vehicles if you don't have that qualification.
Brake fluid has an interesting ability to remove paint that you might want to remember if you are looking for a place to set down that rag soaked in brake fluid. Also brake fluid is very very absorbant to ambient water and that water is not good to have in your brake system. Hopefully we didn't leave out any more important issues that would be critical to the layman that is going to trust his and our lives to here.
I am not going to say that this is rocket science here but... lots of people are counting on this being completed properly. Do so at your own peril and that of others.
Remember also that when the vehicle comes off of the jacks, it has no brakes at all. You best pump them until they are there for you BEFORE you put it in gear. Otherwize you will be very disappointed in the next experience you will likely have on your hands. Also, if air is allowed to enter the system, there is another proceedure to follow to remove that air that needs to be followed and completed properly.
Good luck with it but don't leave it to luck. It is way important this time. Thanks.
Thread Starter
Audi Forum - Posts like an A5
Joined: Oct 2010
Posts: 382
From: Republic of B.C.!


Thread
Thread Starter
Forum
Replies
Last Post
ultrarevvin1
UltraRev
0
Jan 14, 2014 10:22 AM
audimontreal
A4-B7 - (Typ 8E/8H, 2005�2008)
12
Sep 27, 2010 11:02 AM
Currently Active Users Viewing This Thread: 1 (0 members and 1 guests)


