DIY: Paint 101-A Newbie's Guide to Maintain Your Paint!
 05-24-2010, 11:29 AM
#1
Audi Forum - Posts like an A1
Thread Starter

Join Date: May 2010
Location: Ottawa, Canada
Posts: 20

I wrote this because I've been seeing a lot of people who do not know how to properly wash their cars. I thought this would be helpful for those who want to know how they can wash their car without scratching the surface and if interested go on to correct the paint.
Watch this video to show you what bad car wash techniques will do....
http://www.youtube.com/watch?v=PZjWkB_q2lE&
Step 1 -Wash
Washing your car is the most important part of keeping a swirl free ride. Sadly, this is the stage where the majority of the swirls are actually created due to improper washing techniques. I will explain how to properly Wash a vehicle.
What you need:
2 5Gallon buckets
2 Grit Guards
A Good Shampoo (Megs Gold Class, Adams, Chemical Guys Citrus Wash etc...)
Microfibre Washmitt (alternatively you can use lambswool, or Schmitt)
Waffleweave drying towels (these are 100% cotton drying towels that absorb water)
Process:
Rinse the vehicle with a pressure washer and always work from top to bottom.
Once rinsed fill 1 bucket with warm water and the other bucket with soap. Ensure the grit guards are in place.
Using the washmitt start at the top and dip the wash mitt in the soapy water and then onto the car.
Then rinse the wash mitt in the water only bucket to get rid of all trapped debris.
Dip again in soapy water and continue until the whole car has been washed. Do not let the soap dry.
Rinse off and then use the WW Drying Towels to dry the vehicle.
The above washing method is basic. If your car is really dirty I recommend foaming the car first with a foam gun before using the shampoo. Also the wheels and arches should be done first before the paint. A cost effective method to do the wheels is to use a strong All Purpose Cleaner (APC) like Zep's industrial strength or Zep Citrus and diulte 4:1 with water.
To get rid of bugs and tar you can use APC (diluted 4:1 or stronger if needed) and spray over contaminated area. Agitate with soft bristle brush or boars hair brush.
Step 2: Clay
A vehicle is clayed to remove surface imperfections that washing can not remove such as dirt trapped within the paint. Such dirt and debris consists of rail dust, brake dust, overspray, tree sap etc...
What you need:
Clay
Clay Lube
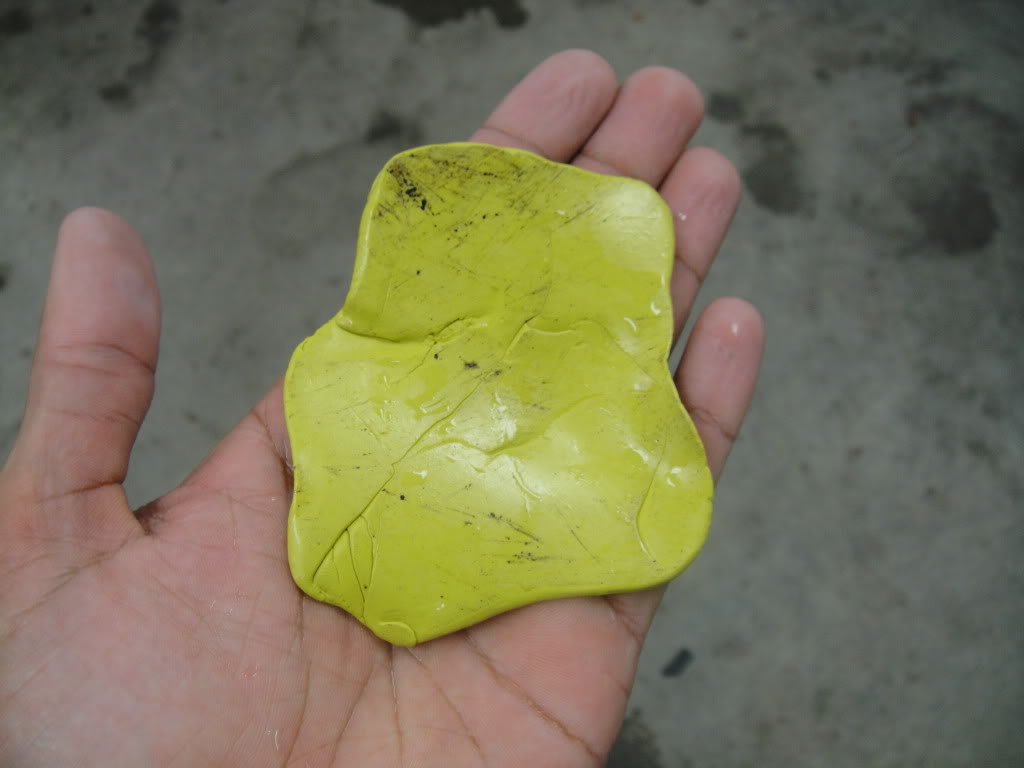
Here's a bmw I did and the grit you see is after 2 washes and just from claying the hood of the car. Claying is important!
Process:
Spray the area with the clay lube and in a back and forth motion use the kneaded clay to rub the surface. Make sure the surface is not hot otherwise clay will marr the area.
-use adequate lube and knead the clay once the surface becomes dirty and repeat until the whole car is clayed. Your shoulders will be sore and it takes about 45min to do a small to mid-size car. Do not use water as lube because water does not provide the same lubricity as some of the lubes on the market.
Claying the surface will also leave your car smooth and glass-like to the touch. A vehicle should be clayed 1 to 2 times per year.
Step 3- Correction/Polishing
This step is optional and it depends on your vehicles condition. If your vehicle has swirl marks and other paint defects such as holograms, buffer trails, and overspray then follow the correction process.
Now this can get complicated and there are hundreds of different methods out there so I will keep it as simple as possible and targeting this to newbies.
What you need:
PC 7424XP
Cutting Pad
Polishing Pad
Finishing Pad
Compound
Polish
Finishing Polish
Now I haven't given any product references because there are literally hundreds of different brands out there so choose whatever you like. For newbies I have seen the Adams line do wonders because it's very easy to use. Here's a link to a Adams package.
Ideally you want to use the least abrasive combination first to remove the imperfections and if that doesn't work you step up a notch. The reason being you want to remove as little clearcoat as possible. Yes, polishing removes clearcoat. But before you get your panties in a knot just know that it is very little. Infact most swirl marks and scratches range from 2-5 microns. 1 micron = 1/1000 of a millimeter. An average car contains about 80-120 microns of clearcoat.
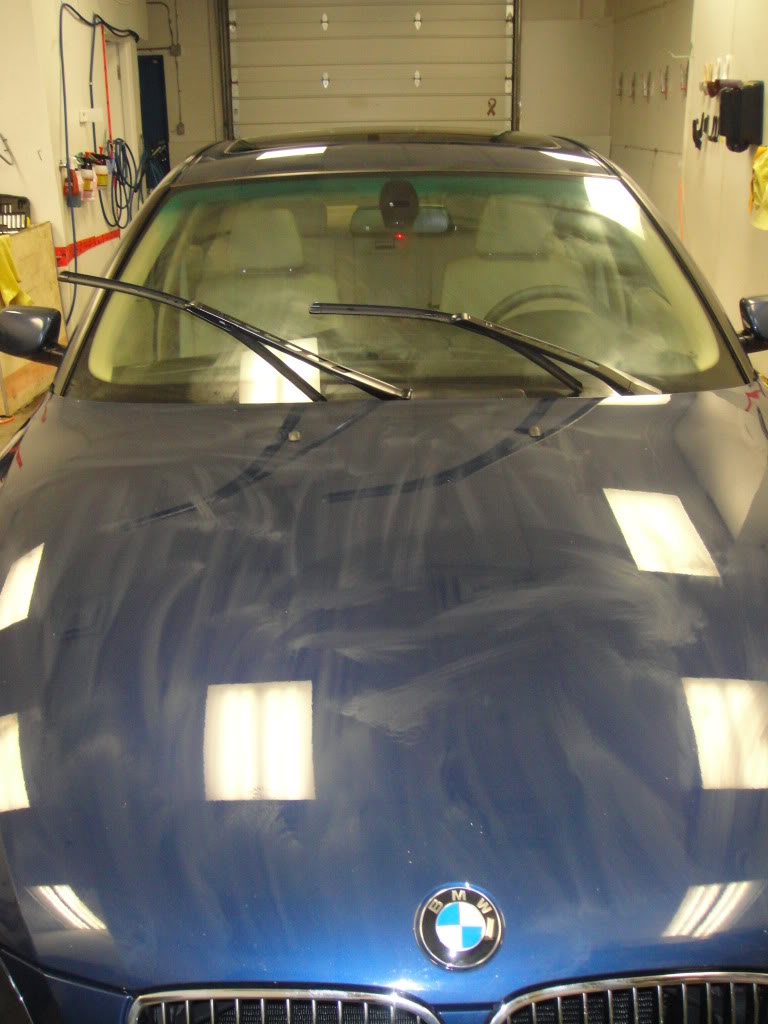
A 50/50 where you can see the area that was corrected vs. the area that isn't. The best way to test your work is to shine a light (or two) and see if (how) it gets distorted and check for clarity.
Step 4 - Last Step Process
Applying a LSP is key. I recommend appyling a Sealant and then a wax.
Sealant - Acts as a layer of glass and gives the car a wet look while protecting it from UV Rays, acid rain, and other elements
Wax - use a Carnauba wax. The higher the content of Carnauba the better. Some of the higher end waxes contain a Carnauba content greater than 50%. Carnauba is a natural wax that comes from Brazil. It has natural waterproof capabilities and also adds a level of depth and lustre to vehicles. Carnauba waxes can range anywhere from $40 to $20 000 for a small container.
Once the car is fully prepped a sealant is applied and allowed to cure on the paint. Once the sealant is buffed off the wax can be applied and layered as the owner pleases. Some good sealants are....Duragloss 105, Chemical Guys Jetseal 109, Opti-seal, Werkstat Jett Acrylic etc....
Some good waxes are...Chemical Guys 5050, Pinnacle Souveran, Lusso Oro, Dodo Juice Supernatural, Wolfgang Fuzion, Swissvax, Zymol.
There's many more brands but you get the idea.
A sealant was applied above and let to cure for 6 hrs.
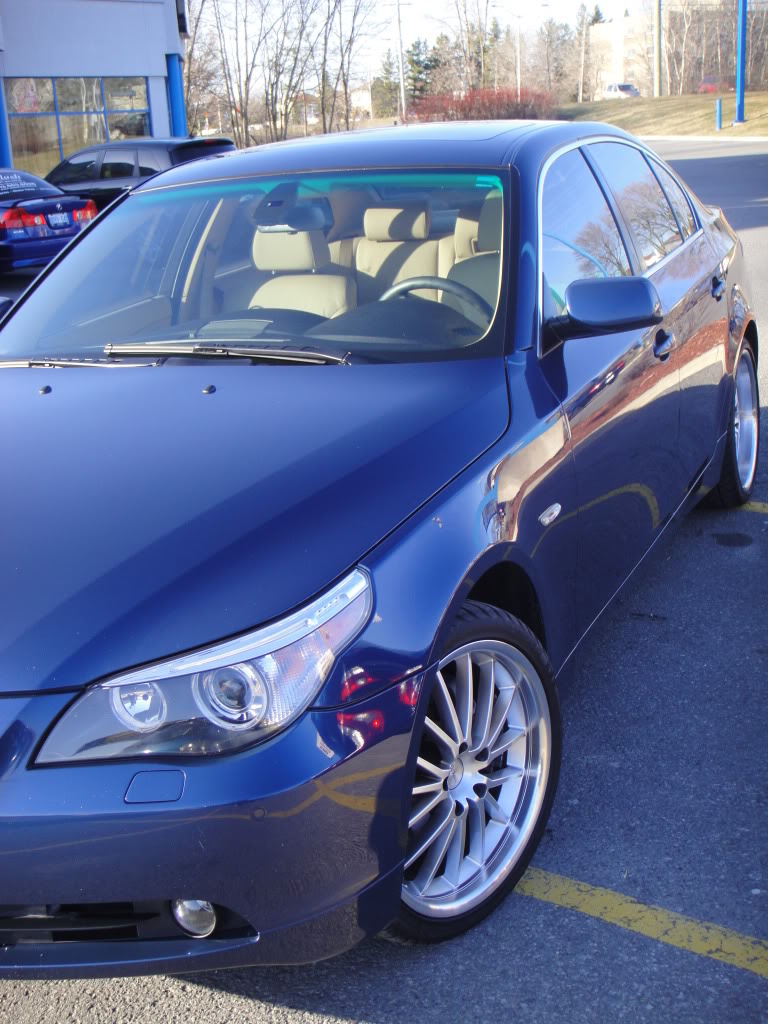
The finished product. Swirl and scratch free. To maintain this finish simply follow the washing procedures.
And that's a GENERAL gist of cleaning a vehicle. Once a vehicle is clean it is proper washing techniques and care that dictates the longevity of the paint's flawless finish. A car that constantly gets abused by squeegees, brushes, and other harsh conditions will obviously have a dull finish.
The above was written for the newbies and as an introduction to detailing. It is a very basic tutorial and if you follow those simple wash steps above you should have a good finish no matter what.
Hope that helps,
-Waseem
Watch this video to show you what bad car wash techniques will do....
http://www.youtube.com/watch?v=PZjWkB_q2lE&
Step 1 -Wash
Washing your car is the most important part of keeping a swirl free ride. Sadly, this is the stage where the majority of the swirls are actually created due to improper washing techniques. I will explain how to properly Wash a vehicle.
What you need:
2 5Gallon buckets
2 Grit Guards
A Good Shampoo (Megs Gold Class, Adams, Chemical Guys Citrus Wash etc...)
Microfibre Washmitt (alternatively you can use lambswool, or Schmitt)
Waffleweave drying towels (these are 100% cotton drying towels that absorb water)
Process:
Rinse the vehicle with a pressure washer and always work from top to bottom.
Once rinsed fill 1 bucket with warm water and the other bucket with soap. Ensure the grit guards are in place.
Using the washmitt start at the top and dip the wash mitt in the soapy water and then onto the car.
Then rinse the wash mitt in the water only bucket to get rid of all trapped debris.
Dip again in soapy water and continue until the whole car has been washed. Do not let the soap dry.
Rinse off and then use the WW Drying Towels to dry the vehicle.
The above washing method is basic. If your car is really dirty I recommend foaming the car first with a foam gun before using the shampoo. Also the wheels and arches should be done first before the paint. A cost effective method to do the wheels is to use a strong All Purpose Cleaner (APC) like Zep's industrial strength or Zep Citrus and diulte 4:1 with water.
To get rid of bugs and tar you can use APC (diluted 4:1 or stronger if needed) and spray over contaminated area. Agitate with soft bristle brush or boars hair brush.
Step 2: Clay
A vehicle is clayed to remove surface imperfections that washing can not remove such as dirt trapped within the paint. Such dirt and debris consists of rail dust, brake dust, overspray, tree sap etc...
What you need:
Clay
Clay Lube
Here's a bmw I did and the grit you see is after 2 washes and just from claying the hood of the car. Claying is important!
Process:
Spray the area with the clay lube and in a back and forth motion use the kneaded clay to rub the surface. Make sure the surface is not hot otherwise clay will marr the area.
-use adequate lube and knead the clay once the surface becomes dirty and repeat until the whole car is clayed. Your shoulders will be sore and it takes about 45min to do a small to mid-size car. Do not use water as lube because water does not provide the same lubricity as some of the lubes on the market.
Claying the surface will also leave your car smooth and glass-like to the touch. A vehicle should be clayed 1 to 2 times per year.
Step 3- Correction/Polishing
This step is optional and it depends on your vehicles condition. If your vehicle has swirl marks and other paint defects such as holograms, buffer trails, and overspray then follow the correction process.
Now this can get complicated and there are hundreds of different methods out there so I will keep it as simple as possible and targeting this to newbies.
What you need:
PC 7424XP
Cutting Pad
Polishing Pad
Finishing Pad
Compound
Polish
Finishing Polish
Now I haven't given any product references because there are literally hundreds of different brands out there so choose whatever you like. For newbies I have seen the Adams line do wonders because it's very easy to use. Here's a link to a Adams package.
Ideally you want to use the least abrasive combination first to remove the imperfections and if that doesn't work you step up a notch. The reason being you want to remove as little clearcoat as possible. Yes, polishing removes clearcoat. But before you get your panties in a knot just know that it is very little. Infact most swirl marks and scratches range from 2-5 microns. 1 micron = 1/1000 of a millimeter. An average car contains about 80-120 microns of clearcoat.
A 50/50 where you can see the area that was corrected vs. the area that isn't. The best way to test your work is to shine a light (or two) and see if (how) it gets distorted and check for clarity.
Step 4 - Last Step Process
Applying a LSP is key. I recommend appyling a Sealant and then a wax.
Sealant - Acts as a layer of glass and gives the car a wet look while protecting it from UV Rays, acid rain, and other elements
Wax - use a Carnauba wax. The higher the content of Carnauba the better. Some of the higher end waxes contain a Carnauba content greater than 50%. Carnauba is a natural wax that comes from Brazil. It has natural waterproof capabilities and also adds a level of depth and lustre to vehicles. Carnauba waxes can range anywhere from $40 to $20 000 for a small container.
Once the car is fully prepped a sealant is applied and allowed to cure on the paint. Once the sealant is buffed off the wax can be applied and layered as the owner pleases. Some good sealants are....Duragloss 105, Chemical Guys Jetseal 109, Opti-seal, Werkstat Jett Acrylic etc....
Some good waxes are...Chemical Guys 5050, Pinnacle Souveran, Lusso Oro, Dodo Juice Supernatural, Wolfgang Fuzion, Swissvax, Zymol.
There's many more brands but you get the idea.
A sealant was applied above and let to cure for 6 hrs.
The finished product. Swirl and scratch free. To maintain this finish simply follow the washing procedures.
And that's a GENERAL gist of cleaning a vehicle. Once a vehicle is clean it is proper washing techniques and care that dictates the longevity of the paint's flawless finish. A car that constantly gets abused by squeegees, brushes, and other harsh conditions will obviously have a dull finish.
The above was written for the newbies and as an introduction to detailing. It is a very basic tutorial and if you follow those simple wash steps above you should have a good finish no matter what.
Hope that helps,
-Waseem
Last edited by ps3king; 05-24-2010 at 11:41 AM.

 05-25-2010, 12:57 PM
#3
Audi Forum - Posts like an S5

Join Date: Apr 2009
Location: Mississauga
Posts: 476
Awesome i actually have written up the same thing a bit ago. Could you actually add the difference between compound and polish. Because if you have swirl marks using compound will do wonders instead of just regular polish.
Here are my additions to the thread:
Pre Soak :
add a presoak, and use bug spray if thats a problem, bugs, if kept on, do a great deal of damage to the paint, be carefull with that.
After cleaning and vacuum
For the glass use ammonia free cleaner, because of the tint, ammonia will destroy it.
Use the regular wipe or something that does not leave it glossy and oily. Say no to armor all.
05-25-2010, 10:37 PM
#4
Audi Forum - Posts like an A1
Thread Starter
Join Date: May 2010
Location: Ottawa, Canada
Posts: 20
Awesome i actually have written up the same thing a bit ago. Could you actually add the difference between compound and polish. Because if you have swirl marks using compound will do wonders instead of just regular polish.
Here are my additions to the thread:
Pre Soak :
add a presoak, and use bug spray if thats a problem, bugs, if kept on, do a great deal of damage to the paint, be carefull with that.
After cleaning and vacuum
For the glass use ammonia free cleaner, because of the tint, ammonia will destroy it.
Use the regular wipe or something that does not leave it glossy and oily. Say no to armor all.
Here are my additions to the thread:
Pre Soak :
add a presoak, and use bug spray if thats a problem, bugs, if kept on, do a great deal of damage to the paint, be carefull with that.
After cleaning and vacuum
For the glass use ammonia free cleaner, because of the tint, ammonia will destroy it.
Use the regular wipe or something that does not leave it glossy and oily. Say no to armor all.
I will edit my thread and make the distinction between a polish and compound. I am in the process of making a series DIY of videos to teach how to polish so that the viewers on audiforums will be able to maintain their own rides for a small investment.
Compounding Vs. Polishing
Before I explain what compounding and polishing is it is important to understand the background and how scratches work.
Scratches are when certain parts of the clearcoat gets penetrated. The depth or level of the scratch determines what polish/pad combination should be used.
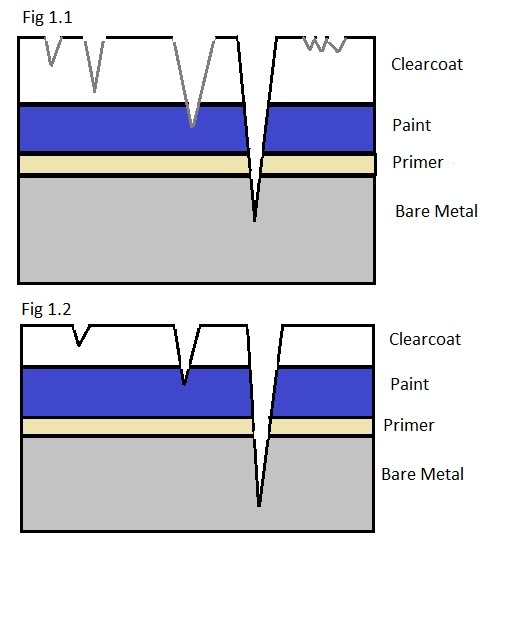
Fig 1.1 shows the scratches on a typical car panel. There are 5 groupings of scratches (from left to right).
As it can be seen there are certain scratches that are too deep and cannot be removed whereas there are others that can be removed. Ultimately in order to remove these scratches the clearcoat must be sanded (very finely). This is where a polisher (like a rotary, or Dual Action) come in handy and polish/compound.
Polish - Contains light to moderate abrasives that range between 1500 to 3000 grits to remove minor to moderate paint defects.
Compounds - contains harsh abrasives that remove between 1000-1500grit for heavier defects. Must only be used when necessary.
Glazes - Fill in scratches and swirls with a glaze that mask the scratches (only a temporary solution).
The majority of scratches and swirls can be removed using 2500 grit polish which is why compounding should be left only for those really deep scratches. There's really no point in removing more clearcoat than you have to.
If you compound constantly to remove scratches you run the risk of wearing down your clearcoat and eventually burning through to your paint. If you burn through your paint the only fix is a respray of that panel which hurts the residual value of your car and is a big hassle.
It is always recommended to use a Paint Thickness Gauge (PTG) that measures the amount of clearcoat that is on your panel. This gives detailers an idea as to how much clearcoat they have to play with and if an area has been resprayed. PTG's can cause thousands of dollars so they're not for the everyday detailer but for the professional.
Back to the diagram
Fig 1.2 shows the panel it has been polished. As you can see the clearcoat is smaller and the minor scratches are gone and the heavier ones are left. In order to make these scratches invisible either a glaze can be used OR what professionals do is round the edges. By rounding the edges light reflects at different angles and creates the illusion that the scratch is non existent (unless you're really close).
More on Compounds
Compounds are very harsh on your paint and should always be followed up by a refining polish to refine the finish. If not it will leave buffer trails and holograms which will easily be picked up in the sunlight.
Majority of dealerships compound a car upon arrival to remove surface defects. This works and since they keep the cars indoors you cannot see the holograms but the second you take it out of the lot BAM!
I always advise my clients to NEVER take a dealership wash or let the dealership touch the paint. If you are taking a brand new car make sure the dealerships will not wash it and take it straight to your professional detailer for prep. If you can ask the dealers not to remove the plastic on the car. Leave that to the real professionals!
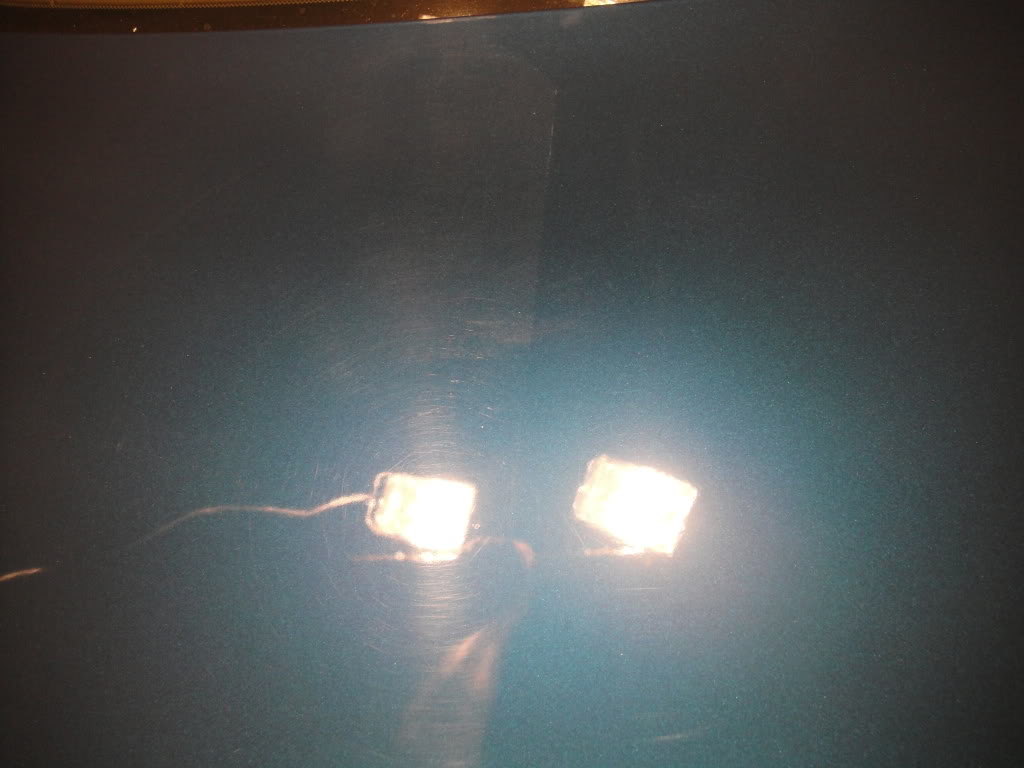
Here's what holograms look like if you're wondering that another forum buddy of mine picked up.
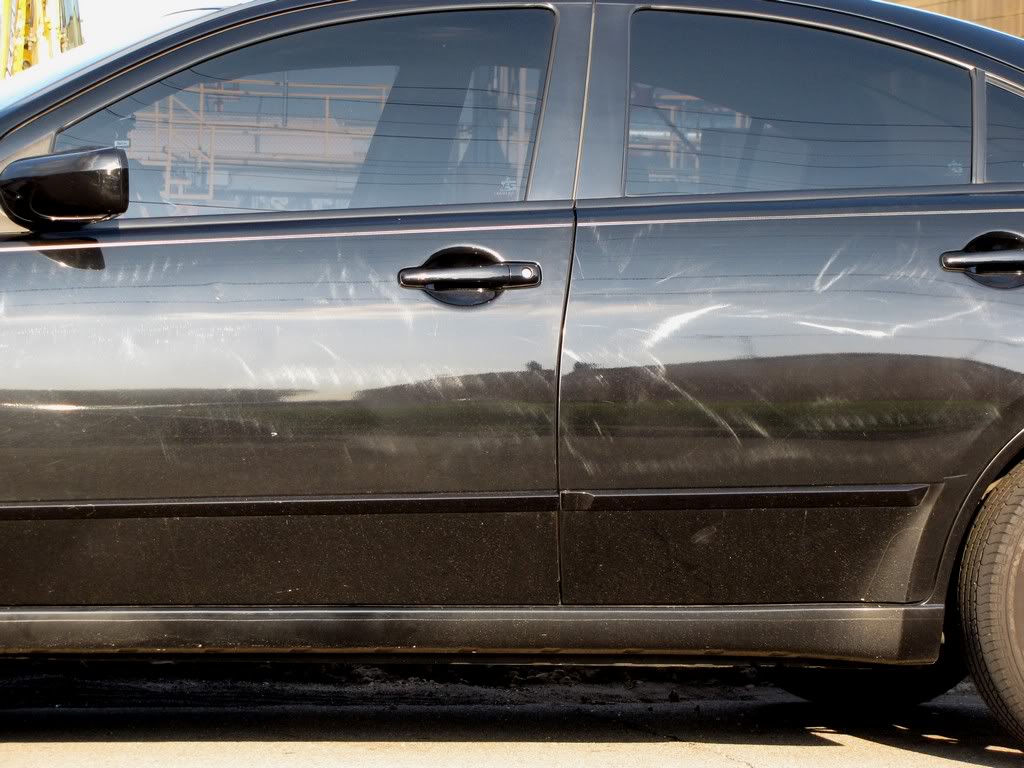
Holograms is what differentiates the amateurs from the real pros.
I hope this helps. Again this is a mouthful of information so if you have any questions please do not hesitate to ask.
Last edited by ps3king; 05-25-2010 at 10:42 PM.
05-25-2010, 11:46 PM
#5
Audi Forum - Posts like an S5
Join Date: Apr 2009
Location: Mississauga
Posts: 476
Awesome write up, this is certainly something that needs a sticky. Everything is in depth.
Last remark i have is that you can pick up a clay bar kit from canadian tire for about 45$ bucks and it has the quick detailer (lube) and everything you need for claying process. And a thing thats must be done is you have to watch the surface of the clay, as soon as it looks kind of dirty, fold it and remold into whats comfortable to use and keep going at it. Its kind of a given but its worth mentioning
I am actually going to be doing my semi-deatail which includes all of the above in a few weeks. I will get my buddy to shoot the video as well for some tips and tricks. Buts its pretty much visual guide to what you posted. Its scary how many people don't know how to properly wash their cars
11-09-2010, 10:43 AM
#6
Audi Forum - Posts like an A1

Join Date: Apr 2010
Location: Calgary
Posts: 47
I am a newbie - couple of questions.
Have a brand new white Q5 with 3M paint protection tape applied in key areas.
I am going to wash it for the first time (only a few days old this weekend.
1. Should I polish after washing it? is this needed for new paint jobs?
2. How many times per year is a polish necessary? After every wash?
3. What do you use to apply the polish? cotton towel? microfibre?
3. Liquid wax - since I have the 3M tape, I need to use liquid wax. Other than the 3M "protect-it" liquid wax, what would you recommend?
Thanks! I'm kinda lost in all the details.
Have a brand new white Q5 with 3M paint protection tape applied in key areas.
I am going to wash it for the first time (only a few days old
1. Should I polish after washing it? is this needed for new paint jobs?
2. How many times per year is a polish necessary? After every wash?
3. What do you use to apply the polish? cotton towel? microfibre?
3. Liquid wax - since I have the 3M tape, I need to use liquid wax. Other than the 3M "protect-it" liquid wax, what would you recommend?
Thanks! I'm kinda lost in all the details.
11-10-2010, 10:23 PM
#7
Audi Forum - Posts like an A1
Thread Starter
Join Date: May 2010
Location: Ottawa, Canada
Posts: 20
I am a newbie - couple of questions.
Have a brand new white Q5 with 3M paint protection tape applied in key areas.
I am going to wash it for the first time (only a few days old this weekend.
1. Should I polish after washing it? is this needed for new paint jobs?
Only necessary to polish if the car has defects like scratches, swirl marks, or holograms as outlined in my previous posts.
2. How many times per year is a polish necessary? After every wash?
Polish only as required. If you wash your car properly without using brushes or tshirts then your car will look brand new a lot longer than a car that goes through harsher treatments. I am a professional detailer and my car receives at most 2 polishes per year and they are fairly small "quick" 1 steppers to give my car the extra pop.
3. What do you use to apply the polish? cotton towel? microfibre?
I think you might be confusing polishing with waxing. Please refer back to my original post to see the difference. If you are referring to waxing a car then you apply the wax with a "wax applicator pad" which is a yellow circular pad that is made of foam.
3. Liquid wax - since I have the 3M tape, I need to use liquid wax. Other than the 3M "protect-it" liquid wax, what would you recommend?
You can use all types of authentic carnauba waxes on top of the 3m paint film. It will not cause any damage to that.
Thanks! I'm kinda lost in all the details.
Have a brand new white Q5 with 3M paint protection tape applied in key areas.
I am going to wash it for the first time (only a few days old
1. Should I polish after washing it? is this needed for new paint jobs?
Only necessary to polish if the car has defects like scratches, swirl marks, or holograms as outlined in my previous posts.
2. How many times per year is a polish necessary? After every wash?
Polish only as required. If you wash your car properly without using brushes or tshirts then your car will look brand new a lot longer than a car that goes through harsher treatments. I am a professional detailer and my car receives at most 2 polishes per year and they are fairly small "quick" 1 steppers to give my car the extra pop.
3. What do you use to apply the polish? cotton towel? microfibre?
I think you might be confusing polishing with waxing. Please refer back to my original post to see the difference. If you are referring to waxing a car then you apply the wax with a "wax applicator pad" which is a yellow circular pad that is made of foam.
3. Liquid wax - since I have the 3M tape, I need to use liquid wax. Other than the 3M "protect-it" liquid wax, what would you recommend?
You can use all types of authentic carnauba waxes on top of the 3m paint film. It will not cause any damage to that.
Thanks! I'm kinda lost in all the details.
11-12-2010, 12:04 AM
#8
Audi Forum - Posts like an A5
Join Date: Mar 2010
Location: Toronto
Posts: 315
I have a question.  Do you know anyone in the GTA you could recommend? I'm only asking because I'm guessing professional detailing (i.e. the real deal, not joker detailers) is probably a small industry.
Then again, it might be so small it stays local to the cities themselves.
Anyway, just thought I'd ask.
Thanks.
Then again, it might be so small it stays local to the cities themselves.
Anyway, just thought I'd ask.
Thanks.
11-13-2010, 11:25 PM
#9
Audi Forum - Posts like an A1
Thread Starter
Join Date: May 2010
Location: Ottawa, Canada
Posts: 20
I have a question. Do you know anyone in the GTA you could recommend? I'm only asking because I'm guessing professional detailing (i.e. the real deal, not joker detailers) is probably a small industry.
Then again, it might be so small it stays local to the cities themselves.
Anyway, just thought I'd ask.
Thanks.
Then again, it might be so small it stays local to the cities themselves.
Anyway, just thought I'd ask.
Thanks.
PM sent.
Anybody else?


