A3 Plugs and Coils Replacement DIY (With Pics)!
 12-30-2010, 10:44 PM
#1
Audi Forum - Posts like an A5
Thread Starter

Join Date: Oct 2010
Location: Republic of B.C.!
Posts: 382

I had been planning to replace the plugs after having the 25,000-mile service done. Since the consensus is that the NGK BKR7EIX Iridium plug is the best choice, I ordered a set of 4 from an eBay vendor. They were $40 for a set of 4 + $2 shipping via USPS.
Note: There are variations of that plug model number with e.g. '-11' or other suffixes. They are not interchangeable. For the A3, you need the BKR7EIX exactly (they are correctly pre-gapped to 0.030"). These are one heat range cooler than the stock plugs.

A coil failed right at my 25K service, so as soon as I got the car back from the dealer I replaced the plugs. Since the coils are removed to reach the plugs, these instructions also cover coil replacement.
Tools needed:
5/8" (16mm) spark plug tool
Wire-type plug gap tool
T-25 torx driver
Procedure:
Unplug the Mass Air Flow (MAF) sensor.
Undo the spring clips and pull out the turbo inlet connector.
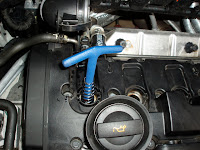
Remove the two T-25 screws on the air snorkle as shown below.
Remove the engine cover by pulling up HARD where indicated by the green circles in the photo below.

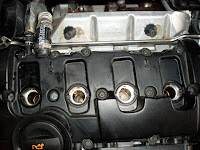
Release the clips on the 4 electrical connectors to the four coils, and carefully move the harness out of the way.
The Coils are not held in by any clips, you just have to pull them straight up. It may help to make a small strap of cloth to slip under the edge of the cap of the coil to give you something to pull up on, rather than trying to pry them up to get a grip by hand.

If you're just replacing a coil, do so now and put everything back together. If you're replacing plugs, then use the plug tool to loosen and remove the four plugs. If you have access to compressed air to blow dust/debris out of the plug recesses before you remove the plugs, that would be a good idea.
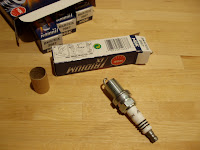
Check the gap of the new plugs before installation using a wire-type plug gap tool. They should be pre-gapped at 0.030". Do not change the gap, as you can damage the centre electrode.
Reinstallation is the reverse of removal. When installing the new plugs, spin them in gently to avoid cross-threading. Once they are finger-tight, tighten them down according to the instructions on the packaging (~ 2/3 turn). Insert the coils and press down firmly until they seat - there isn't really a tactile 'click' when they're seated. Make sure the wiring harness is plugged in securely and each connector 'clicks' locked.
The rubber grommets on the underside of the engine cover may have popped out during removal, make sure they are completely seated into the cover before pressing the cover down onto the 4 posts where it mounts.
It may be a combination of things with the new coils and new plugs, but the engine now feels like it did when new - it had (subjectively) lost some of that feeling over 25K, so I'll probably make plug and coil changes a regular maintenance item every 25K miles now.
SOURCE
Note: There are variations of that plug model number with e.g. '-11' or other suffixes. They are not interchangeable. For the A3, you need the BKR7EIX exactly (they are correctly pre-gapped to 0.030"). These are one heat range cooler than the stock plugs.
A coil failed right at my 25K service, so as soon as I got the car back from the dealer I replaced the plugs. Since the coils are removed to reach the plugs, these instructions also cover coil replacement.
Tools needed:
5/8" (16mm) spark plug tool
Wire-type plug gap tool
T-25 torx driver
Procedure:
Unplug the Mass Air Flow (MAF) sensor.
Undo the spring clips and pull out the turbo inlet connector.
Remove the two T-25 screws on the air snorkle as shown below.
Remove the engine cover by pulling up HARD where indicated by the green circles in the photo below.
Release the clips on the 4 electrical connectors to the four coils, and carefully move the harness out of the way.
The Coils are not held in by any clips, you just have to pull them straight up. It may help to make a small strap of cloth to slip under the edge of the cap of the coil to give you something to pull up on, rather than trying to pry them up to get a grip by hand.
If you're just replacing a coil, do so now and put everything back together. If you're replacing plugs, then use the plug tool to loosen and remove the four plugs. If you have access to compressed air to blow dust/debris out of the plug recesses before you remove the plugs, that would be a good idea.
Check the gap of the new plugs before installation using a wire-type plug gap tool. They should be pre-gapped at 0.030". Do not change the gap, as you can damage the centre electrode.
Reinstallation is the reverse of removal. When installing the new plugs, spin them in gently to avoid cross-threading. Once they are finger-tight, tighten them down according to the instructions on the packaging (~ 2/3 turn). Insert the coils and press down firmly until they seat - there isn't really a tactile 'click' when they're seated. Make sure the wiring harness is plugged in securely and each connector 'clicks' locked.
The rubber grommets on the underside of the engine cover may have popped out during removal, make sure they are completely seated into the cover before pressing the cover down onto the 4 posts where it mounts.
It may be a combination of things with the new coils and new plugs, but the engine now feels like it did when new - it had (subjectively) lost some of that feeling over 25K, so I'll probably make plug and coil changes a regular maintenance item every 25K miles now.
SOURCE
Last edited by mksu19; 12-31-2010 at 02:33 AM.


Thread
Thread Starter
Forum
Replies
Last Post
nickm79
Audi parts for sale & wanted.
0
08-18-2015 08:41 AM
mksu19
A4 - B5, B6, B7, B8
3
07-30-2012 01:18 AM
mksu19
A4 - B5, B6, B7, B8
24
02-29-2012 01:42 PM
mksu19
A4 - B5, B6, B7, B8
1
01-09-2011 05:11 PM
Currently Active Users Viewing This Thread: 1 (0 members and 1 guests)


